docs.semactic › Semactic Features
Content Studio
Content Studio is where you plan, write, review and publish content optimised for Google (SEO) and for AI engines (GEO). Each article targets keywords and prompts you track, is written with AI help, goes through your review steps and is then followed to measure its impact.
[!INFO] On this page: the views (List, Kanban, Timeline, Cluster), creating a content, writing in the editor, scores and recommendations, review workflow, publishing and tracking, settings.
[!NOTE] Content Studio is always in the sidebar. If your plan does not include it, the page opens on a lock screen (Upgrade plan) over a preview: contact your Semactic account manager to enable it.
Views
Content Studio has four tabs:
| Tab | What it shows |
|---|---|
| List | All your contents in a table, with filters on every column. |
| Kanban | Your contents by stage: Write, Review, To publish, Published. |
| Timeline | Your contents over time (Week, Month, Quarter or Year), grouped by label, author, type or stage. |
| Cluster | A map of your topic clusters, with pillar pages and the contents around them. |
Switch between My content and Team to see your own work or the whole team's. In Team, the Team workload panel shows how many articles each author has in each stage.
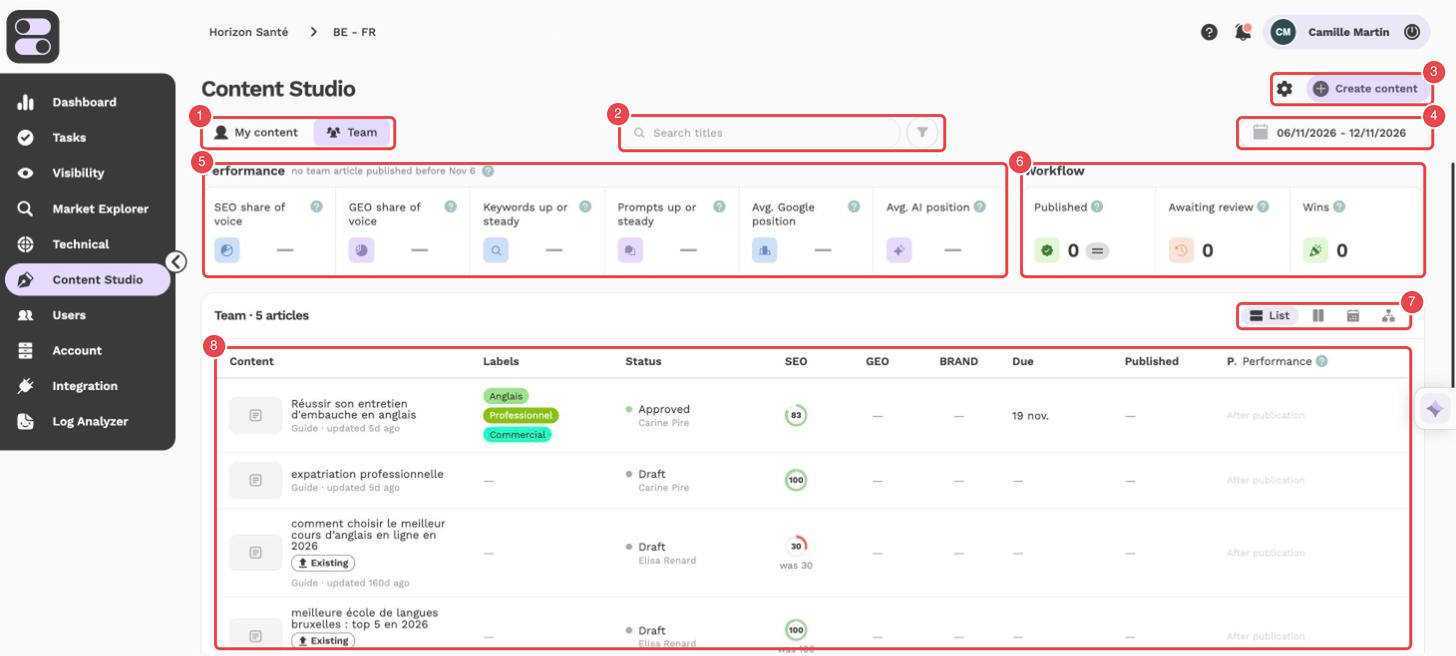
What the numbers show:
- My content / Team — your own contents, or the whole team's.
- Search and filter — search by title, and the filter button.
- Settings (cogwheel) and Create content.
- Period — the period used by the performance indicators.
- Performance banner — SEO share of voice, GEO share of voice, Keywords up or steady, Prompts up or steady, Avg. Google position and Avg. AI position.
- Workflow banner — Published, Awaiting review and Wins.
- View selector — switches between the four views; the List view is selected here, the next icons open Kanban, Timeline and Cluster.
- Contents list — title, labels, status and author, SEO, GEO and BRAND scores, due date, publication and performance.
List columns
| Column | Description |
|---|---|
| Content | Title and type, with the creation, update and publication dates. |
| Labels | The labels of the content. |
| Status & owner | The current stage and the person in charge. |
| SEO, GEO, BRAND | The three content scores (see below). |
| Deadline | The due date. |
Performance KPIs
Above the views, KPIs show the impact of your published contents over the selected period: SEO share of voice, GEO share of voice, Keywords up or steady, Prompts up or steady, Avg. Google position (top 20 positions only) and Avg. AI position, plus Wins (featured snippet, top 3, top 20, ten places gained or more, a spot in AI answers), the number of contents Published and those Awaiting review.
[!NOTE] Performance KPIs only count contents published before the start of the period. Each article is compared with the same number of days before its own publication date.
Creating a content
- Click Create content.
- Setup: choose the market, Start from scratch or I already have content (fetch a URL, paste text or upload a file), enter the topic and pick a Focus keyword and/or a Focus prompt from your tracked lists.
- Details: add secondary keywords and prompts, up to 5 labels and up to 10 reference sources.
- Production: choose the writer and Deadline, the Content type, the Search intent, the Writing instructions, the languages to Translate to and the optional review steps.
- Click Create & open → to open the editor.
[!NOTE] The content is saved as soon as the Setup step is validated. Creating a new prompt in the wizard counts towards your prompt allowance; picking a prompt you already track does not.
Writing in the editor
The editor guides you from outline to finished article:
- Build the outline: Semactic suggests Topics to cover based on the pages that rank in Google and the sources AI engines cite. Add them one by one or all at once.
- Click Write my article with AI to generate the text, or write it yourself.
- Refine with the AI actions on a section or on selected text: Generate this section, Rephrase, Continue writing, Translate or Custom instructions.
- Fill in the Meta title and Meta description (AI can suggest them).
Write whole article can rewrite everything, only the empty sections, or the sections you choose. Lock a section to keep the AI from changing it. Your work is saved automatically.
Scores and recommendations
Click Evaluate Article to compute three scores:
| Score | What it measures |
|---|---|
| SEO | How well the article covers what Google expects for its keywords. |
| GEO | How likely AI engines are to use and cite the article for its prompts. |
| BRAND | How well the article follows your brand guidelines (shown once your brand knowledge base is filled in). |
The side panel lists the topics still to cover and the recommendations behind each score, each with a Why, a How and a Generate with AI button. Other side-panel tabs show the linked tasks from Tasks, the comments and the History (the last 10 evaluated versions, which you can compare and restore).
Review workflow
If you selected review steps (Expert, Brand, Copywriter, Translation), click Submit for review when the draft is ready. Each reviewer can Approve or Request changes (a comment is required). Back to draft cancels the review cycle.
[!TIP] Set a Review deadline for each reviewer: they get a reminder 24 hours before, and the step is approved automatically when the deadline passes.
In the Kanban, cards only move forward: from Write to Review (submits it), from Review to To publish (approves the current step), and from To publish to Published (requires the publication URL).
Publishing and tracking
Once the article is approved, the Publish step lets you:
- export it (Download HTML, Markdown, Copy text);
- publish it directly to WordPress, Webflow, Shopify or Drupal, now or at a scheduled time (see Integrations);
- or publish it yourself, then enter the Published URL and click Mark as published.
The Track step then shows, for each target keyword and prompt, the position and share of voice before and after publication.
To create another language version, use Translate on an approved or published article: it creates a separate article in another market of the same project.
Settings
Content Studio settings has three tabs:
- Writing instructions — named rules and a tone of voice per market, which you select when creating a content.
- Brand knowledge base — your tone of voice, differentiators and up to 3 reference documents, shared by all markets of the brand. Fill in with AI drafts it for you.
- Content types — the types of content you produce.
Deleting a content
Open Article settings, click Delete this article, then Confirm deletion.
[!WARNING] A deleted article cannot be recovered. Its keywords and prompts stay tracked in the market, and its other language versions are kept.