docs.semactic › Semactic Features
Users
The Users page is where you invite team members, give them access to projects with the right role, and follow their activity and task progress. Open it from Users in the left sidebar.
The page is available to Project Managers and above. Each user only sees the users of the projects they have access to.
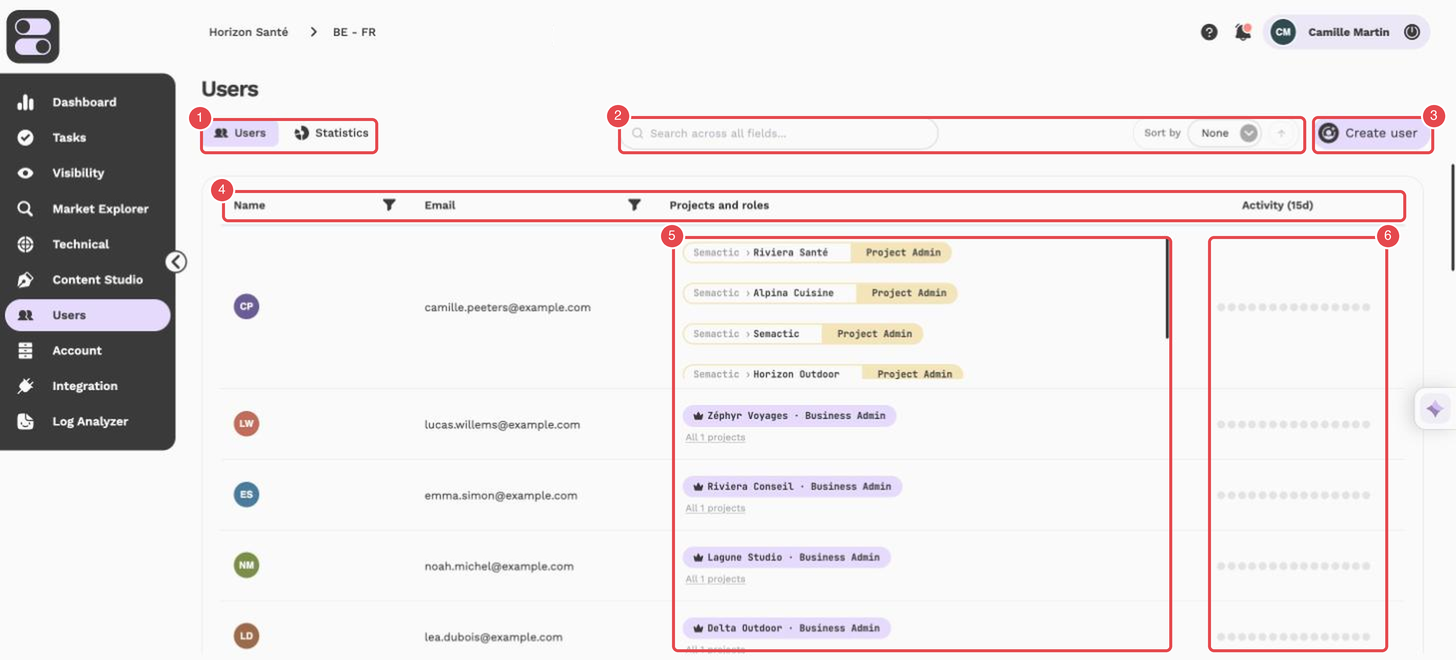
What the numbers show:
- Users / Statistics tabs — switch between the user list and the statistics.
- Search and Sort by — search across all fields and sort the list.
- Create user — opens the invitation form.
- Name and Email columns — with a filter icon on each; they are the only columns that have one.
- Projects and roles — a crown marks a Business Admin (a right, not a role); "project › name" followed by a role is the user's role on one project.
- Activity (15d) — one dot per day over the last 15 days.
The page has two tabs:
- Users — the list of users, with their projects and roles.
- Statistics — task progress per market and per user.
Roles
Access is granted per project: a user can be Admin on one project and Digital Specialist on another.
| Role | Typical use |
|---|---|
| Admin (shown as Project Admin in the Projects and roles column) | Full access to the projects of the business account, including projects, markets, users and integrations. |
| Project Manager | Full access, limited to the projects they are assigned to. Can invite users and assign tasks on those projects. |
| Digital Specialist | Day-to-day SEO/GEO work: keywords, labels, prompts and their own tasks. Cannot manage other users' tasks. |
| Digital Enabler | Mostly read-only access; can work on the tasks assigned to them. |
| Partner | Same access as Digital Enabler, for external stakeholders. |
Business admin is not a role but a right attached to a business account: it gives the Admin role on every project of the account, including account management and billing, without having to be assigned to each project one by one. In the list it appears as a crown label, followed by All N projects; its project role cannot be changed or removed as long as the right exists. It is granted in Create user or in Edit user > Access, only by a business admin of that account.
[!TIP] For the full list of what each role can do, see What access does each role have?.
Find a user
The bar above the list lets you search and filter users:
- Type text in the search field (name, email, project, role) to filter the list.
- Use the filter icon of the Name and Email columns to filter on those columns.
- Use Sort by to sort the list.
User list columns
| Column | Description |
|---|---|
| Name | The user's name and avatar. |
| The email address the user signs in with. | |
| Projects and roles | Each project the user can access, with their role on it. A business admin appears as Business Admin on the business account; click All N projects to see the projects it covers. |
| Activity (15d) | One dot per day over the last 15 days, coloured by type of event: login, invitation, password reset or failed login. |
Invite a user
Open the invitation form
On the Users tab, click Create user.
Fill in the user's details
Enter the Email, First name and Last name, then choose a Role. You can only give a role up to your own level.
Give access to projects
Under Assign projects, tick the projects the user should access (use the search field to find them). If you are allowed to, you can also make the user a Business admin of a business account.
Send the invitation
Click Invite user. The user receives an email to activate their account.
[!NOTE] Tick Private user to hide this user from the user lists of your other team members.
Edit a user's access
Click a user in the list to open the Edit user window. It has two tabs:
- Edit user — first name, last name, email and the Private user option.
- Access — the business accounts the user is business admin of, and the Assigned projects. Change the role of a project with its drop-down, add projects with Assign project, or remove access with the trash icon.
Click Save changes to apply your changes.
[!NOTE] To remove someone's access to a project, delete that project from their Assigned projects. A user with no project left can no longer access any data.
Statistics tab
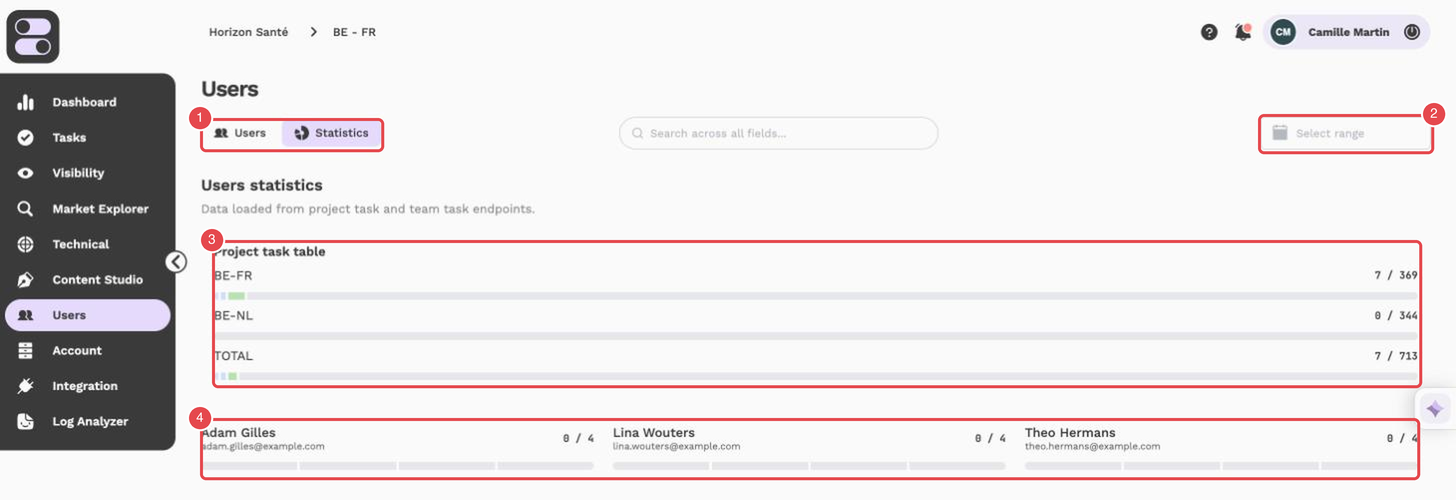
What the numbers show:
- Users / Statistics tabs — the Statistics tab is selected.
- Select range — the period of the statistics.
- Project task table — one line per market, with a counter "x / y" (the sum of the segments shown out of the total number of tasks) and the segments Assigned, In progress, Done and Abandoned.
- User cards — the same counter and segments for each user.
The Statistics tab shows how tasks are progressing for the selected project and market.
- Project task table — one bar per market, with a counter "x / y": the sum of the segments shown, out of the total number of tasks of the market. The segments are Assigned, In progress, Done and Abandoned; the grey rest is Remaining. The segments overlap (an assigned task can also be done), so their sum can exceed the total and Remaining may not appear.
- Per user — below it, the same bar for each user.
The period selector at the top of the page applies to the user cards, not to the project task table.
[!TIP] Use the Statistics tab in your weekly review to spot markets with many pending tasks and rebalance work between team members.